Cooking Recipe For All

Get all Item Recipes is Here

Breaking

Showing posts with label toddler-approved. Show all posts

Friday, August 22, 2014

August 22, 2014

Mozzarella Stuffed Meatballs

You know a recipe is good when it pushes you out of your blogging slump. These Mozzarella Stuffed Meatballs did just that. I couldn't wait to share them with you guys and I managed to schedule a few more posts while I was at it.

Mozzarella stuffed meatballs

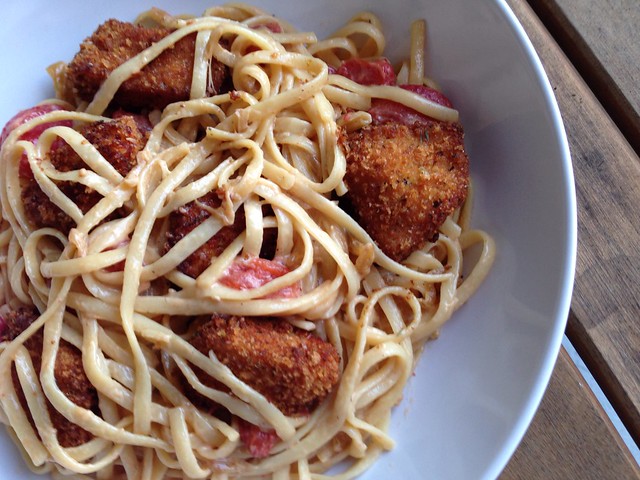
I saw these meatballs on my friend Jaida's blog and she raved about them, so I figured I'd give them a shot. I've been in a cooking rut lately, remaking a lot of old favorites rather than trying new stuff. We've been on a fresh mozzarella kick lately and I knew you couldn't go wrong stuffing it into a meatball. This was an incredibly easy meal to make, perfect for a weeknight. It took less than 10 minutes to make the meatballs and, bonus, I had frozen sauce in the freezer. It took longer to chop the ingredients for the salad I served on the side.

Mozzarella stuffed meatballs

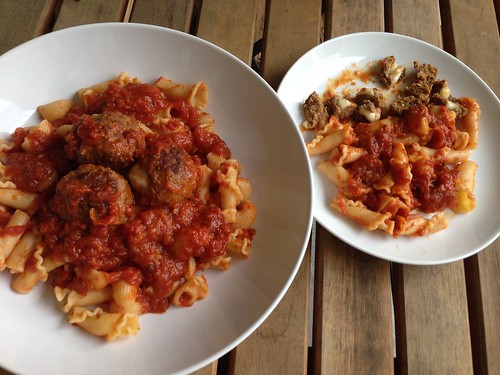
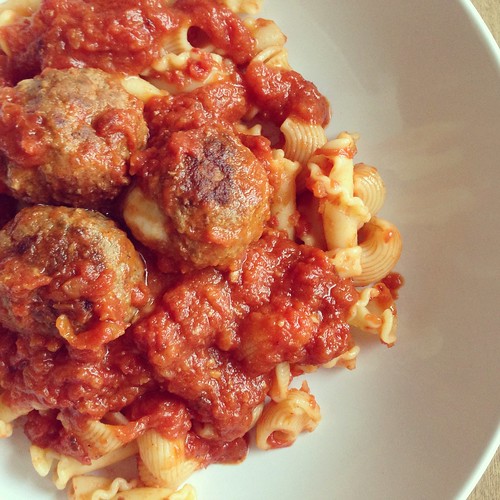
What I didn't expect was for these to be the most flavorful meatballs I've ever made. We were all blown away. Baby Girl said, "these aren't just good, Mommy. They're amazing, awesome and wonderful." It's been awhile since I've photographed dinner outside, so Baby Girl jumped at the chance to have her plate next to mine for a picture.

Mozzarella stuffed meatballs

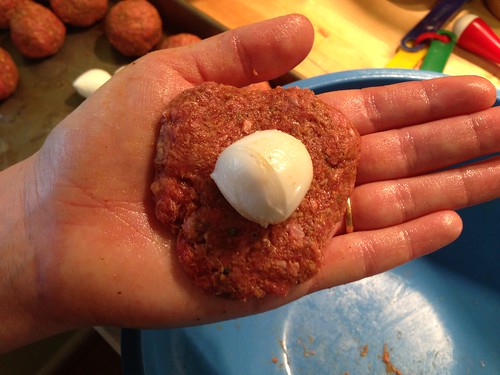
Despite the fact that I thought I'd sealed the meatballs well, most of mine broke open while they cooked. Fortunately, the cheese didn't really melt or leak out. Just make sure you really, really seal them well. I had 14 mozzarella balls, but you may want to stick with the 10-12 in the recipe below so there's more meat to fully encase the cheese.

Mozzarella Stuffed Meatballs
As seen on Sweet Beginnings

1 egg
1/3 cup Italian seasoned bread crumbs
1 lb lean ground beef
1 teaspoon chili powder
1/2 teaspoon paprika
1 teaspoon dried Italian seasoning
1 teaspoon salt
1/2 teaspoon black pepper
1 teaspoon minced garlic
10-12 mini balls fresh mozzarella (bocconcini), or fresh mozzarella cut in small pieces
3 cups pasta sauce

Whisk the egg in a large bowl. Add the bread crumbs, ground beef, chili powder, paprika, Italian seasoning, salt, black pepper, and garlic and mix with your hands until combined.

Divide the meat into 10-12 balls (a couple of tablespoons each). Flatten each section of meat, then wrap it around one mozzarella ball. Squish the edges together to be sure it's sealed. Repeat this process until you've used up all the meat.

Heat a large, non-stick skillet over medium heat (no need to add oil, there's plenty of fat in the meat). Add the meatballs and cook for a couple of minutes on each side, until well-browned.

Add the pasta sauce (enough to coat the bottom and come up about halfway up the meatballs) to the skillet. Simmer for about five minutes, turning the meatballs occasionally to coat them in the sauce.

Serve the meatballs over pasta or rice, as a sandwich, or by themselves.

Wednesday, July 16, 2014

July 16, 2014

Caprese Macaroni and Cheese

It's no secret that I love all things caprese. So when Stephanie posted this recipe for Caprese Macaroni and Cheese I was intrigued. Why had it never occurred to me to combine two of my favorite things into one dish?

Caprese Mac and cheese

This will come as no surprise, but this dish was outstanding. The gooey, cheesy mozzarella, the bright tomatoes and the fresh basil all worked so well with the creamy sauce. In an effort to make this a wee bit healthier I omitted the cream and upped the amount of milk. I also upped the amount of flour so the sauce would thicken. I used canned diced tomatoes, but if you've got tomatoes and basil in your garden I highly recommend using those instead. When I made this my basil plant hadn't started growing yet but thankfully my neighbors were overrun with basil and gladly shared some with me.

Caprese Mac and cheese

Caprese Macaroni and Cheese
As seen on Stephanie Cooks

1/2 pound elbows (or other short-cut pasta)
2 tablespoons butter
2 cloves garlic (I omitted)
2 tablespoons flour
1 1/2 cups whole milk
1/2 cup chicken broth
1 teaspoon garlic salt
Black pepper
1 1/2 cups shredded mozzarella cheese
1 cup diced tomatoes (fresh or canned)
minced fresh basil, to taste

Cook pasta according to package directions. Drain and place back in the pot.

In a large saucepan, melt the butter and garlic (if using), stirring well. Add the flour, mixing, until a paste forms. Slowly whisk in the milk, broth, garlic salt, and black pepper. Bring to a boil.

Remove the saucepan from the heat and stir in the mozzarella cheese, tomatoes and basil. Taste and season with salt and pepper, if needed. Add the cooked pasta, stirring, until covered in cheese sauce. Serve immediately.

Monday, July 14, 2014

July 14, 2014

Recipe Redo: Mexican Sour Cream Rice

I've been making this Mexican Sour Cream Rice for years. I used to make it any time we had anything even slightly Mexican-inspired for dinner. It was definitely my go-to side dish.

Mexican sour cream rice

I've been recommending the dish to friends a lot recently and I figured it was time to update my blog with some better pictures. Please forgive those early blogging pics - I may not be a professional photographer but I think my photos have come a long way since then.

Mexican sour cream rice

The last time I made this I used regular Monterrey Jack cheese instead of pepper Jack because Baby Girl doesn't like spicy things. We both felt it lost a little something with the milder cheese so next time I'm going to throw caution to the wind and go back to pepper Jack. We don't remember it being super spicy that way so hopefully Baby Girl won't refuse to eat it.

Mexican Sour Cream Rice
Modified from All Recipes

1 3/4 cups chicken broth
1 cup uncooked long grain white rice
1 cup sour cream
1 (4 ounce) can diced green chile peppers
2 cups shredded Monterey or pepper Jack cheese
1 1/2 cups frozen corn
1/4 cup finely chopped fresh cilantro
salt and pepper to taste

Bring the chicken broth to a boil in a large sauce pot. Add the rice, stir and then reduce the heat to low. Cover and simmer for 20 minutes.

Meanwhile, preheat the oven to 350. Lightly grease a 1-1/2 quart casserole dish.

Add the sour cream, green chile peppers, cheese, corn, and cilantro to the pot with the rice. Stir to combine, then season with salt and pepper. Transfer to the greased casserole dish.

Bake uncovered for 30 minutes until the top is lightly browned.

Wednesday, July 9, 2014

July 09, 2014

Pasta with Smashed Peas, Sausage, and Ricotta Cheese

We had an almost-full container of ricotta cheese in the fridge, so I asked SP to search for a recipe to use it up. He found this one for Tagliatelle with Smashed Peas, Sausage, and Ricotta Cheese that sounded both easy and delicious.

Linguine with sausage, peas and ricotta

Like I do with most pasta recipes these days, I only used a half pound instead of the full pound. Cutting down on the pasta while keeping the filler ingredients the same is an easy way for us to get our pasta fix without going overboard. I also cut the peas down from a full pound to a half pound because, wow a pound is a lot of peas. SP wanted the sauce to be smoother. We couldn't taste the ricotta at all, which was disappointing, but we still enjoyed it.

Pasta with Smashed Peas, Sausage, and Ricotta Cheese
Giada De Laurentiis

1/2 pound fresh or dried tagliatelle pasta (or other wide, long pasta)
2 tablespoons olive oil
2 cloves garlic, chopped
1 pound hot Italian sausage, casings removed
1/2 pound frozen peas, thawed
1 cup whole milk ricotta cheese
1 bunch fresh basil leaves chopped (about 3/4 cup)
1/4 cup fresh grated Pecorino Romano cheese
salt and pepper, to taste

Bring a large pot of salted water to a boil over high heat. Cook the pasta according to package directions. Drain, reserving 1 cup of the pasta cooking water.

Meanwhile, in a large, heavy skillet heat the olive oil and garlic over medium-high heat and add the sausage. Use a wooden spoon to break up the sausage into bite-sized bits.

Once the sausage has browned, about 5 minutes, remove and set aside. Add the peas to the pan and, using the back of the wooden spoon, smash the peas.

Turn off the heat. Add the ricotta cheese along with the cooked pasta and toss to coat, adding the pasta cooking water in 1/4 cup additions, if needed, to make the pasta moist. Return the sausage to the pan. Add the basil, Pecorino Romano cheese, and salt. Toss gently to coat and serve immediately

Wednesday, July 2, 2014

July 02, 2014

Grilled Chicken Tacos with Spiced Mayo and Avocado Salsa

These Grilled Chicken Tacos with Spiced Mayo and Avocado Salsa are, hands down, my new favorite taco. As soon as I saw them I knew I had to make them. I could almost taste them just by reading the recipe.

Chicken tacos

I had to make a slight modification because I refuse to pay $1 for one lime when I can't even be guaranteed the lime will have any juice in it. Have you ever bought a lime and found it completely dry? How does that even happen? Lemons are still cheap so I just swapped it out. I also left out the hot sauce because Baby Girl isn't a fan of spicy food.

I prepared these on my indoor grill pan because, as I've mentioned before, we have a charcoal grill and getting that set up on a weeknight just doesn't happen. Since skewers won't fit on the grill pan I cut the chicken breasts in half lengthwise and grilled them before cutting into cubes. Same for the onion - I grilled it in rings and then chopped them. These tacos were so delicious we barely had enough leftover for one lunch the next day.

Grilled Chicken Soft Tacos with Spiced Mayo and Avocado Salsa
As seen on Seeded at the Table, originally from Weber's New Real Grilling

For the chicken:
zest of 1 lemon
1/2 teaspoon ground cumin
Salt & pepper
Olive oil
4 boneless, skinless chicken breasts, cut in half lengthwise
1 large yellow onion, peeled and cut into 3/4-inch rings

1/2 cup mayonnaise
Juice from 1 lemon
1 teaspoon hot sauce (optional)
1/4 teaspoon cumin

For the Avocado Salsa:
2 large avocados, peeled, pitted and diced
2 medium Roma tomatoes, seeded and finely diced
3 scallions, minced
2 tablespoons fresh lemon juice
1 tablespoon chopped cilantro
1/4 teaspoon hot sauce (optional)
8 taco or fajita-size flour tortillas

Preheat grill pan over medium-high heat.

In a large bowl or plastic food storage bag, combine the lemon zest, 1/2 teaspoon cumin, 1/2 teaspoon salt, 1/4 teaspoon black pepper and a few tablespoons of oil. Place the chicken pieces into the bowl or bag and toss to combine until evenly coated with the seasonings. In a separate bag or bowl, toss the onion rings with some oil, salt and pepper.

In a small bowl, whisk together the mayonnaise, lemon juice, hot sauce (if using), and 1/4 teaspoon cumin. Stir in water, 1 teaspoon at a time, until the mixture can be drizzled.

In another bowl, toss together the salsa ingredients and season with salt and pepper, to taste.

Add the onion rings to the grill pan and cook, turning often, until the onions are soft and blackened in spots. Remove from the grill to a bowl and cover with foil or plastic wrap. Add the chicken to the grill pan and cook 5 minutes on one side, then flip and cook another 4 minutes. Remove from the grill and let rest. Add the tortillas to the grill pan to warm and brown in spots, turning once. Cut the chicken and onions into bite-size pieces. Let everyone assemble their own tacos with the mayo and salsa.

Monday, June 16, 2014

June 16, 2014

Roasted Mushroom Risotto {Review}

I recently received a variety of rice from RiceSelect to sample. One of the samples was an arborio blend with mushrooms. We love risotto around here, so as soon as I saw this recipe for Roasted Mushroom Risotto I knew the arborio blend with mushrooms would be perfect.

Untitled

This was an outstanding risotto. The roasted mushrooms had great flavor but I think my favorite part was the dried chanterelles. I was a little hesitant to buy them since half an ounce was $4.99, but it was well worth it. They added a great depth of flavor that really brought the whole dish together.

Untitled

We love RiceSelect products (I'm a big fan of their pearl couscous, even though I haven't been able to find it for ages) so I knew their arborio would be a hit. And it was. Baby Girl, who up until this point has been hit or miss with mushrooms, positively loved this. She told me she was a big fan and cleaned her plate.

Roasted Mushroom Risotto
As seen on Rachel Cooks

1/2 ounce dried chanterelle mushrooms
24 ounces white mushrooms cut in halves or quarters
4 tablespoons extra virgin olive oil, divided
1 tablespoon fresh thyme leaves, roughly chopped
Salt and pepper to taste
6 cups vegetable broth/stock
4 tablespoons unsalted butter, divided
1 clove garlic, minced
1/2 yellow onion, finely diced
1 1/4 cups Arborio rice
1/2 cup dry white wine (e.g. Chardonnay)
1/2 cup freshly grated Parmesan cheese more for garnish, if desired

Preheat oven to 425°F.

Place the dried chanterelle mushrooms and pour boiling water over them. Let them soak for twenty minutes. Drain and rinse, then set aside.

Place the white mushrooms on a large rimmed sheet tray and toss with 3 tablespoons olive oil, thyme and a sprinkle of salt and pepper. Spread into a single layer and place in preheated oven. Roast for 15 minutes, stir, and roast for another 10-15 minute or until golden brown.

Meanwhile, bring stock to a simmer in a saucepan.

In a deep, heavy skillet, melt 2 tablespoons butter and 1 tablespoon oil over medium-high heat. Add the rehydrated chanterelles, garlic and onion and saute for about 5 minutes or until onions are translucent. Add the rice and cook for another 2-3 minutes to toast the rice, stirring frequently.

Add the white wine and bring to a boil. Add 1 cup of the simmering stock, and keep stirring nearly constantly, making sure to push down any rice stuck to the edges of the pans. Once the liquid is nearly absorbed, add another 1 cup of stock. Continue to do this until the rice is cooked but still slightly chewy, about 25 minutes. Taste the rice frequently to check the consistency.

Remove from heat and stir in 2 tablespoons butter, Parmesan cheese and roasted mushrooms. Taste and add more salt and pepper, as needed. Serve immediately.

Disclaimer: I received free samples of RiceSelect rice. I was not paid to write this review and all opinions are my own.

Wednesday, May 28, 2014

May 28, 2014

Crunchy Baked Tacos

I love tacos but there was always something about them that made me feel like they wouldn't work for a weeknight. I think it was all the prep work for the various toppings, trying not to overfill them at the table and a general dislike of tacos made with soft flour tortillas. Then I saw these Crunchy Baked Tacos from No. 2 Pencil and it was like a light bulb went off in my head. Minimal work and crunchy shells. I was sold.

Crunchy baked tacos

Baking the shells with the meat and cheese already inside was brilliant - I hate when the cheese isn't fully melted and this solves that problem. Plus, you just take a taco from the baking dish and you're ready to eat. I kept the toppings simple - shredded lettuce, diced grape tomatoes and I found an avocado in my crisper so I diced that up, too. Some sour cream at the table and we were set.

Crunchy baked tacos

This is definitely my new favorite taco recipe. I swapped out my filling recipe but kept the method the same. The one thing I didn't like - these don't reheat well the next day. In fact, they were downright awful. My recommendation would be to only make as many as you anticipate eating. The good news is they take hardly any time to cook so you can assemble some more and bake them off quickly if you decide you want a second helping.

Crunchy Baked Tacos
Filling from A Taste of Home Cooking, method from No. 2 Pencil

1 5.8 oz box yellow corn taco shells (12 shells)
1 pound ground beef
1 onion, chopped
1 clove minced garlic
2 teaspoons cumin
2 teaspoons chili powder
Salt and pepper
2 tablespoons tomato paste
1/2 cup salsa
1/4 cup sour cream
2 cups of freshly shredded colby jack cheese
romaine lettuce, shredded
vine-ripened tomatoes, diced
sour cream
taco sauce

Preheat oven to 400 degrees and place shells in a 9x13 baking dish.

Heat a saute pan over medium heat. Add the ground beef and cook, breaking up the large chunks, until just starting to brown. Add the onion and garlic and saute until the onions are soft and the beef is cooked through. Add the cumin, chili powder, salt, pepper and tomato paste. Let cook for about 5 minutes. Off heat, add the salsa and sour cream and stir to incorporate.

Sprinkle half of the cheese in the bottom of each taco shell. Evenly distribute the ground beef in each shell. Top ground beef with remaining shredded cheese.

Bake for 8-10 minutes (mine were done at 8 minutes), or until cheese is melted and shells have started to crisp.

Remove from oven and top with lettuce, tomatoes, sour cream and taco sauce.

Monday, May 5, 2014

May 05, 2014

Deviled Eggs

I've been making deviled eggs for years but I've never shared my recipe here. It's fairly simple but very, very delicious. I don't measure the mayo or mustard, just go by feel and taste.

deviled eggs

I've never been good at piping the filling back into the eggs, so excuse the unstyled photos. We inhaled these at Easter. Baby Girl loves them - she had three. Next year I'm making a full dozen since there were no leftovers.

Untitled

Deviled Eggs

12 eggs
mayo
yellow mustard
salt
pepper

Put the eggs carefully in a large pot. Fill the pot with cold water so the eggs are completely covered. Put the pot on the stove and bring to a boil. Turn the heat off, cover the pot and allow to sit for 12 minutes. Drain the eggs and immediately submerge in ice water. Allow to cool completely.

Once the eggs are cool, peel them. Cut each egg in half and remove the yolks to a bowl. Mash each yolk as you add it to the bowl so the yolk is a smooth paste. Add some mayo (start with a few tablespoons) and mash into the yolks. You want the mixture to be smooth and creamy. Add more mayo as needed to get the consistency you want. Add a few squirts of mustard to taste. The more mustard you add the spicier they'll be. Season with salt and pepper.

Pipe or spoon the filling back into each egg half.

Wednesday, April 23, 2014

April 23, 2014

Pasta alla Norcina

Baby Girl loves to watch cooking shows on TV. I'll admit, the first time she told me she wanted to watch Lidia I shed a tear. When we aren't crazy busy with other activities we'll spend some quiet time Saturday afternoon watching cooking on PBS. That's pretty much how I developed my love of cooking so she's in good company.

One afternoon recently we were watching America's Test Kitchen and they made this recipe for Pasta alla Norcina. It had everything we love in one dish - pasta, mushrooms and sausage, with a touch of heavy cream thrown in to gild the lily. I immediately found the recipe online and printed it off.

Untitled

This was my first time making orecchiette for Baby Girl and she couldn't get enough. She was eating the plain pasta right out of the colander after I drained it. SP told me I could make this once a week and he'd be happy. It may seem a little time consuming with all the steps (it wouldn't be an ATK recipe without all those steps) but the result is well worth it. And it really doesn't take that long to put together.

I doubled the recipe (printed below) so we'd have enough for leftovers the next day. This makes a lot - I'd say 6-8 servings if you have a veggie on the side - so the original recipe would probably work fine for a family of 4 without leftovers.

Pasta alla Norcina
From America's Test Kitchen

Kosher salt and pepper
1/4 teaspoon baking soda
8 ounces ground pork
2 garlic cloves, minced
1 teaspoon minced fresh rosemary
Pinch ground nutmeg
8 ounces cremini mushrooms, trimmed
10 teaspoons vegetable oil
2/3 cup heavy cream
1 lb orecchiette
1/2 cup dry white wine
2 ounces Pecorino Romano cheese, grated
2 tablespoons minced fresh parsley
3 teaspoons lemon juice

Grease a small dinner plate with vegetable oil spray. Dissolve 1 1/2 teaspoons salt and the baking soda in 4 teaspoons water in a medium bowl. Add the pork and fold gently to combine; let stand for 10 minutes.

Add 1 teaspoon garlic, 1/2 teaspoon rosemary, nutmeg, and 1 teaspoon pepper to pork and stir and smear with a rubber spatula until well combined and tacky, 10 to 15 seconds. Transfer pork mixture to the greased plate and form into a 6-inch patty.

Pulse the mushrooms in a food processor until finely chopped, 10 to 12 pulses.

Heat 4 teaspoons oil in 10-inch skillet over medium-high heat until just smoking. Add the sausage patty and cook without moving it until the bottom is browned, 1 to 2 minutes. Flip and continue to cook until the second side is well browned, 1 to 2 minutes longer (very center of patty will be raw). Remove pan from heat, transfer sausage to cutting board, and roughly chop. Transfer sausage to bowl and add cream; set aside.

Cook pasta, drain and reserve 1 1/2 cups cooking water.

While pasta cooks, return now-empty skillet to medium heat. Add 4 teaspoons oil, mushrooms, and pinch salt; cook, stirring frequently, until mushrooms are browned, 3 to 5 minutes. Stir in remaining 2 teaspoon oils, remaining garlic, remaining 1/2 teaspoon rosemary, and ½ teaspoon pepper; cook until fragrant. Stir in wine, scraping up any browned bits, and cook until completely evaporated. Stir in sausage and 1/3 cup reserved cooking water and simmer until meat is no longer pink, 1 to 3 minutes. Remove pan from heat and stir in Pecorino until smooth.

Add sauce, parsley, and lemon juice to pasta and toss well to coat. Before serving, adjust consistency with remaining reserved cooking water as needed and season with salt and pepper to taste.

Monday, April 21, 2014

April 21, 2014

Goat Cheese and Apple Chicken

Recently I had half a log of goat cheese leftover and I knew exactly what I wanted to make with it. I'd had Nicole's Goat Cheese and Apple Chicken saved for awhile and couldn't wait to try it.


We all enjoyed this a lot, although I found myself wishing for a bit more of the goat cheese. The apple flavor was less pronounced than I thought it would be but I loved the crunch mixed with the creaminess of the cheese. I'll definitely make this one again.

Goat Cheese and Apple Chicken
As seen on Prevention RD

non-stick cooking spray
3 large boneless, skinless chicken breasts, halved lengthwise
salt and pepper
20 saltine crackers
1 teaspoon garlic salt
1 egg
2 tablespoons water
2 tablespoons olive oil
4 oz goat cheese, at room temperature
1 apple, peeled, cored, and diced

Preheat the oven to 350. Line a baking dish with aluminum foil and spray with non-stick spray. Season chicken with salt and pepper.

Add the saltines to a food processor and pulse to make crumbs. You could also add the crackers to a bag and smash them into crumbs. Place the crumbs in a shallow bowl or pie plate and add the garlic salt. In another shallow bowl or pie plate, whisk the egg with a fork, then add the water. Dip the seasoned chicken into the egg and then the cracker mixture.

Heat a non-stick pan over medium heat and add the oil. Cook the chicken on both sides until brown and crispy, about 5 minutes per side. Place the chicken in the baking dish.

In another small bowl combine the goat cheese and the apple. Spread the mixture evenly over the chicken breasts.

Bake the chicken for about 10-15 minutes or until cheese is warm and browned. Remove from oven and serve hot.

Friday, April 11, 2014

April 11, 2014

Linguine with Crispy Chicken, Roasted Tomatoes, and Caramelized Onion Cream Sauce

When Cassie first posted a photo of this Linguine with Crispy Chicken, Roasted Tomatoes, and Caramelized Onion Cream Sauce on Facebook I was hooked. And then she posted the recipe on her blog and I knew I had to make it. It's got everything I love in one dish - pasta, crispy chicken, tomatoes and caramelized onions. Yum!!


I was able to prep some of the components during the day, which made it easier to throw together at the end of the day. Baby Girl is an excellent eater (and very polite - she always tells me she loves my cooking) but she doesn't usually proclaim anything as her favorite. After her first bite of this dish she told me she loved it and it was her favorite meal. After every bite she told me I had to make this again and again and again.

Untitled

We all enjoyed this and it reheated well, which is pretty impressive for a cream-based pasta dish. Everything comes together so well. I particularly liked the apple juice in the onions - it added just a hint of sweetness. I was worried this would be heavy but it was actually pretty light. I can't wait to honor Baby Girl's request and make this again.

Linguine with Crispy Chicken, Roasted Tomatoes, and Caramelized Onion Cream Sauce
As seen on Cassie Craves

8 ounces linguine, cooked according to package directions
Parmesan cheese

For the roasted tomatoes:
1 pint cherry tomatoes
1 tablespoon olive oil
Salt and pepper to taste

For the chicken:
1 large chicken breast, cut into bite-sized chunks
1 egg, beaten
1 cup panko breadcrumbs
1/2 cup Italian-style breadcrumbs
1 teaspoon Italian seasoning
1/2 teaspoon garlic powder
1/2 teaspoon each salt and black pepper
Vegetable oil for frying

For the sauce:
1 large onion, thinly sliced
2 tablespoons butter
1 tablespoon olive oil
3 cloves garlic, minced
1/2 cup apple juice
1 cup heavy cream (I used 1/2 and 1/2)
Salt and pepper to taste

Preheat the oven to 400 degrees. Arrange tomatoes on a foil-lined baking sheet; drizzle with olive oil, sprinkle with salt and pepper, and toss to combine. Cook for 20 minutes or until browned and bursting.

Meanwhile, add the beaten egg to a large bowl. Mix together the panko, Italian breadcrumbs, Italian seasoning, garlic powder, and salt and pepper in a separate bowl. Heat vegetable oil in a medium saucepan (enough to shallow-fry the chicken). Dip the chicken pieces in the egg, then in the breadcrumb mixture. Fry in batches until golden and crispy; remove to a paper-towel-lined plate.

Melt the butter and olive oil in a large skillet. Add the onions, season with salt and pepper, and cook over medium-low heat, stirring frequently, until onions are fragrant and caramelized. Add the garlic; cook and stir for 30 seconds. Raise heat to medium-high and stir in the apple juice, scraping the bottom of the pan with a wooden spoon to pick up any browned bits. Let the apple juice reduce slightly, then stir in the cream. Reduce heat back to medium-low and heat gently until thickened; taste for seasoning and add salt and pepper to taste.

Gently stir together the reserved tomatoes, crispy chicken, and pasta. Add the sauce and toss gently to combine. Serve with parmesan cheese.