vegetables
November 01, 2017
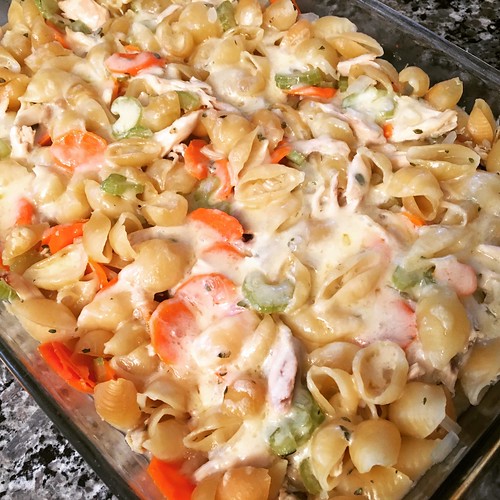
Chicken Noodle Soup Casserole

Do you ever make a recipe and just know that it's going to be something you make again and again and again? This Chicken Noodle Soup Casserole is one of those recipes. Not only was it delicious, it was one of the easiest meals I've ever made.
The beauty of this recipe is two-fold:
1. Everything bakes together in a casserole dish so you don't even have to worry about food splatter on your stovetop.
2. It's hearty and comforting for those chilly nights.
To make this even easier, I used rotisserie chicken (I've been buying rotisserie chickens and freezing the meat in small portions for pizzas or recipes like this one) and prepped the celery, carrots, onion, thyme and garlic the night before. I made this for Halloween night since Steve and Katie like to have a quick meal before heading out for candy. I dumped everything in a huge bowl, mixed it all up, popped it in the oven to bake, steamed some green beans and called it dinner. So, so good.
The only issue was some of the pasta wasn't fully submerged in the broth so it didn't cook properly. I'm hoping that's easily solved by giving this a quick stir halfway through the cooking time. I can't wait to make it again!
Get the 3-month trial and all food 10-50% off >> get your offer >D
Chicken Noodle Soup Casserole
As seen on The Seasoned Mom
2 cups diced, cooked chicken (rotisserie chicken works great)
2 celery stalks, diced
2 large/4 small carrots, peeled and diced
1/2 large onion, finely diced
1 tablespoon fresh thyme leaves, minced (or 1 teaspoon dried thyme)
2 large garlic cloves, minced or grated
12 ounces uncooked rotini pasta (I used shells)
4 cups low-sodium chicken broth
1 teaspoon salt
1 cup shredded cheddar cheese
Get the 3-month trial and all food 10-50% off >> get your offer M
Preheat oven to 425. Spray a 9 x 13-inch baking dish with cooking spray.
In a large bowl), stir together cooked chicken, celery, carrots, onion, thyme, garlic, uncooked pasta, chicken broth, and salt until well mixed. Pour into the baking dish and spread evenly.
Cover tightly with foil and bake for 40 minutes, uncovering to stir halfway through to make sure all the pasta has a chance to cook.
Uncover and sprinkle the cheese over the top. Bake uncovered for 5-10 more minutes until the cheese is melted. Let cool for a few minutes before serving.