Cooking Recipe For All

Get all Item Recipes is Here

Breaking

Wednesday, October 29, 2014

October 29, 2014

Recipe Redo: Crash Hot Potatoes

These crash hot potatoes were all the rage back in 2008. Like most food bloggers, I made them a few times and then they fell off my radar.

Crash hot potatoes

Recently, I was looking for a side dish to go with burgers. I had planned to make potato salad, but the day got away from me. Normally I'd go with my standby roasted potatoes, but we were out of red potatoes. It was late afternoon and I had no clue what to make with my basket full of Yukon golds. I Googled Yukon gold potatoes and side dish and while these potatoes didn't come up in the initial search, something I clicked on reminded me of them and off I went.

Baby Girl, being the insane child she is, doesn't like potatoes. She took a tiny nibble and then said "no thank you." She won't eat French fries, mashed potatoes, tater tots, home fries, etc. either. Weirdo. SP and I loved them. He was especially enamored of them, so much so that he insisted I make them again the following night. They do take a bit of planning ahead because you have to boil the potatoes whole, smash them and then bake them, but the hands-on time is minimal. I used fresh herbs from my garden (rosemary and thyme), which was the perfect combination. And I love that you can make as many as you want - I made four the first night and five the next and we ate the leftovers the next day, reheated in the toasted oven to try to bring back some of the crispiness.

Crash Hot Potatoes
As seen on The Pioneer Woman

Small Yukon gold potatoes (as many as you want to serve)
Olive oil
Kosher salt, to taste
Black pepper, to taste
Fresh rosemary and thyme, to taste

Scrub the potatoes well and place in a large pot. Try to choose potatoes that are roughly the same size so they'll all cook at the same rate. Cover the potatoes with cold water and add some salt. Place the lid on the pot and bring to a boil. Cook the potatoes for 20 minutes, or until they are fork-tender.

Drizzle some olive oil on a baking sheet and use a pastry brush to spread the oil evenly. Drain the potatoes and place them on the baking sheet, leaving plenty of room between each potato.

Using a potato masher, gently press down on each potato until it flattens. Brush the tops of each crushed potato with more olive oil. Sprinkle the potatoes with plenty of kosher salt, fresh ground black pepper and fresh chopped rosemary and thyme.

Bake in a 450 degree oven for 20-25 minutes until golden brown and crispy. Serve hot.

Monday, October 27, 2014

October 27, 2014

Chocolate Chip Cream Cheese "Cookies"

I'm not sure where I first saw these Chocolate Chip Cream Cheese Breakfast Cookies but my best guess is one of my friends shared the link on Facebook. Or maybe it was one of the blogs I follow. Either way, as soon as I saw them I knew I had to make them. I printed off the recipe and waited for the right time.

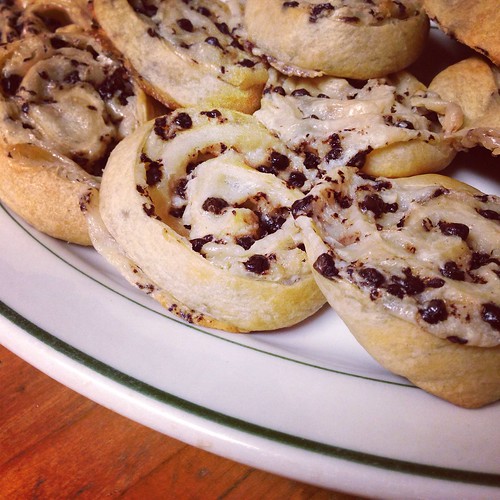
Chocolate cream cheese cookies

The right time came a few weeks ago for Sunday dinner with my parents. A friend of theirs was over so we had enough people to make a dent in the cookies (they don't really reheat well). Of course mine look nothing like the ones in the original blog post but who cares. They still tasted phenomenal and are so simple to make.

I baked these at my mom's house and they took a bit longer than the 12-14 minutes stated in the recipe so my suggestion is to watch them closely after the 15-minute mark and take them out when they're golden brown. Mine sort of fell apart, but like I said, it didn't matter. We all loved these. They are definitely best served warm. When they sat for more than a few minutes they got a bit chewy and tough so bake them right before you want to eat them.

PS. I took the word breakfast out of the title because, let's be honest, these are not breakfast food. I also put cookies in parentheses because they aren't really cookies either.

Chocolate Chip Cream Cheese "Cookies"
As seen on Cookies and Cups
Makes approximately 15 cookies

1 can seamless crescent rolls
1 (8 oz) block cream cheese, at room temperature
1/4 cup sugar
2 teaspoons vanilla
1/2 cup mini chocolate chips

Unroll the crescent roll sheet and stretch the dough out slightly in the shape of a rectangle.

Using a hand mixer, beat the cream cheese, sugar and vanilla together until smooth in a medium sized bowl. Spread the cream cheese mixture over the top of the crescent sheet, leaving an edge of about 1/2 inch. Sprinkle the chocolate chips on top of the cream cheese.

Roll the crescent sheet up tightly and wrap in cling wrap. Refrigerate overnight.

When you're ready to bake them, preheat the oven to 350°. Line two cookie sheets with parchment paper.

Slice the roll into 1/2" slices. Arrange half the slices on each baking sheet. Bake for 10 minutes, then rotate the sheets (move the sheet on the bottom rack to the top rack and vice versa, as well as turn the sheets a half turn). Bake for another 5-10 minutes, until they turn golden brown around the edges. Transfer to a wire rack and allow to cool slightly. Eat warm.

Friday, October 24, 2014

October 24, 2014

Tomato Soup with Butter Dumplings

My mom has been making Tomato Soup with Butter Dumplings for years. I tried to make it once and failed miserably. We recently went to Disney World for Baby Girl's 5th birthday and my mom graciously offered to drive us to the airport. Since our flight was so early, she spent the night at our house before we left. We wanted a simple dinner that wouldn't yield leftovers, so I asked her to make tomato soup with butter dumplings.

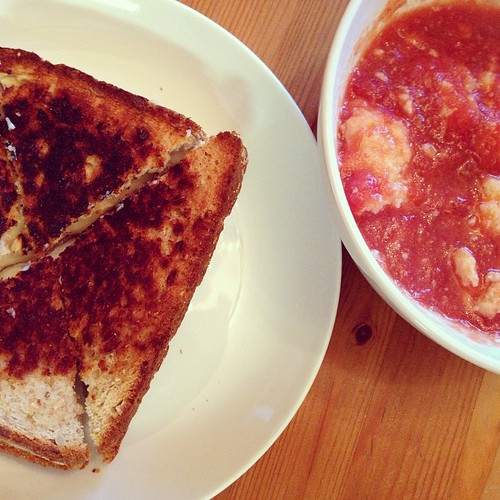
Grilled cheese and tomato soup with butter dumplings for dinner tonight.

She always uses tomatoes we've canned to make the soup, but I think you could substitute whole, peeled tomatoes if you don't have canned tomatoes available. This is most definitely a trial and error recipe. I don't think anyone gets it right the first time (I know I didn't). Practice makes perfect, though, so if you're at all interested in this one, keep trying.

Untitled

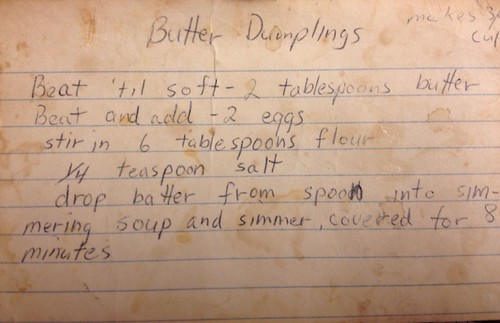
This is the original recipe. I think it came from my stepgrandmother. As you can tell, it's been around for quite awhile!

Tomato Soup with Butter Dumplings

3 jars canned tomatoes (or 2 28-oz cans whole, peeled tomatoes)
salt, to taste
2 tablespoons butter, at room temperature
2 eggs, at room temperature
6 tablespoons flour
1/4 teaspoon salt

Open the jars (or cans) of tomatoes and dump the contents into a large pot. Use an immersion blender to lightly puree the tomatoes. You can also puree the tomatoes in a food processor. Heat the tomatoes over medium-high heat until boiling. Add salt to taste.

Beat the butter until soft. Beat in the eggs one at a time. Stir in the flour and salt. The batter will be lumpy with the butter and flour. Don't over beat but try to eliminate the flour clumps.

Reduce the heat under the soup so it's at a very light simmer. Drop spoonfuls of the batter into the simmering soup. Cover and cook for 8 to 10 minutes. Check on the dumplings halfway through cooking and turn them over.

Allow the soup to cool slightly before serving.


Wednesday, October 22, 2014

October 22, 2014

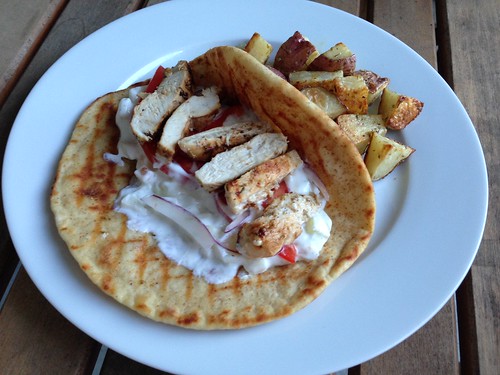
Recipe Redo: Chicken Gyros

A few years ago I made these chicken gyros all. the. time. They were a staple on our dinner table and for good reason - they're delicious. It had been a very long time since I made them and since the photos I took back then weren't exactly stellar, I figured I'd revisit this old favorite and update the photos.

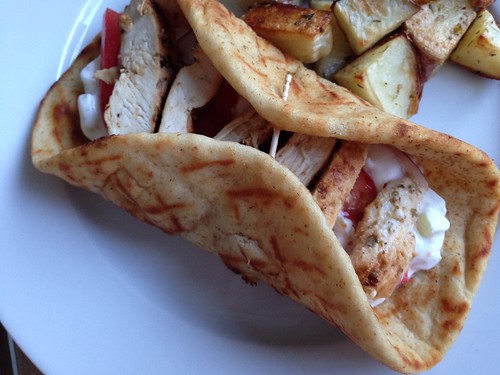
Chicken gyros

Unfortunately, I still didn't get a great shot of these but they're still better than the old photos. I served the gyros with roasted potatoes liberally seasoned with oregano. I loved dipping the potatoes into some of the leftover tzatziki sauce. Yum.

Chicken gyros

Chicken Gyros
As seen on Elly Says Opa!

4 cloves garlic, smashed
Juice of 1 lemon
2 teaspoons red wine vinegar
2 tablespoons extra virgin olive oil
2 heaping tablespoons plain Greek yogurt
1 tablespoon dried oregano
1 1/4 lbs. chicken breast, cut in half lengthwise
salt and pepper
1 cup tzatziki (see below)
sliced tomatoes
sliced red onion
4 pocketless pitas or flatbread

Whisk together the garlic, lemon juice, vinegar, oil, yogurt, and oregano in a bowl. Add the chicken and rub the marinade in. Cover and refrigerate for one hour.

Preheat a grill or grill pan over medium-high heat. Season the chicken with salt and pepper on both sides. Add the chicken to the hot grill pan and cook for 5 minutes. Flip over and cook for 4 minutes. Remove to a cutting board and allow the chicken to rest for a few minutes before slicing into strips.

While the chicken is cooking, heat your pitas. If you have a gas stove, turn on a burner to medium heat. Spray the pitas with a little bit of oil and cook them right on the burner for a few seconds per side.

Top the pita with some of the chicken, tzatziki, tomatoes, and onions. Roll up and eat. Be careful, they're messy.

Tzatziki
1 cup plain greek nonfat yogurt
1/2 a small cucumber
Salt and pepper to taste
1 small garlic clove, minced
Squeeze of fresh lemon juice

Put the yogurt in a bowl. Peel the cucumber, then cut it in half lengthwise and remove the seeds. Grate it over the large holes of a box grater. Place the grated cucumber in a clean kitchen towel and ring out the water over the sink. Add the cucumber to the yogurt, along with the other ingredients. Mix well. Taste and adjust the seasonings, as needed. Chill before serving.

Monday, October 20, 2014

October 20, 2014

Spinach & Parmesan Orzo

::tap, tap, tap:: Is this thing on?

Sorry for disappearing there. I'm hoping some of you have stuck around despite the brief hiatus. I've been saying for months now that I've lost my blogging mojo and, well, it still hasn't returned. But I do have a few posts in my draft folder that I figured I should get published. I hope you guys will stick with me as I weather this (hopefully temporary) storm.

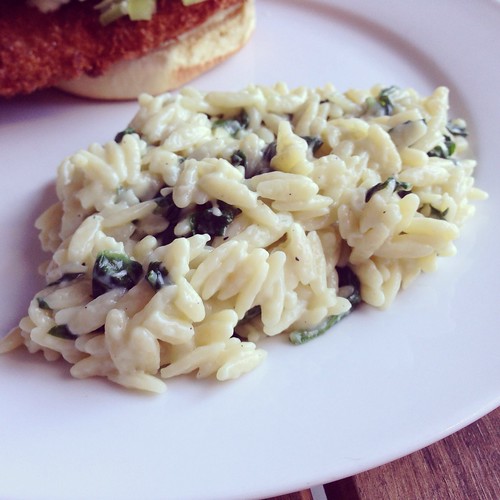
So...spinach and Parmesan orzo. I saw this one on my friend Kylee's blog and it looked like a great, simple side dish. Right up my alley these days.

Spinach parm orzo

As suspected, it was easy to make and we all loved it. Baby Girl kept calling it risotto, one of her all-time favorite cold weather meals. I'll definitely be making this one often.

Spinach & Parmesan Orzo
As seen on Kylee Cooks

8oz orzo pasta
1 tablespoon olive oil
2 garlic cloves, minced
1 tablespoon flour
1/2 cup milk
1 1/2 cups baby spinach, roughly chopped
1/2 cup parmesan cheese
Salt and pepper, to taste

Cook the orzo according to the package directions.

While the orzo is cooking, heat the olive oil in a saucepan. Add the garlic and cook just until it's fragrant.
Sprinkle the flour into the pot and stir to combine. Whisk in the milk, and continue to cook over low heat until thickened. Add salt and pepper to taste.

Once the orzo is cooked, drain it and add it to the sauce. Add the spinach and Parmesan. Stir gently to combine. Taste it and adjust the seasoning, as needed.

Friday, September 26, 2014

September 26, 2014

Grilled Ham and Cheese Sandwiches with Caramelized Onions

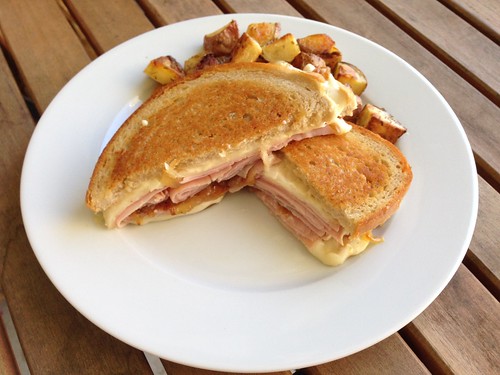
I like to put at least one sandwich on the menu each week. They're usually easy to make and we all enjoy them (although Baby Girl likes to deconstruct her sandwiches/burgers so she can eat each ingredient separately. Don't ask.) I saw these Hot Ham and Cheese Sandwiches with Bacon and Caramelized Onions on Pinch of Yum and thought they'd make a great grilled cheese sandwich.

Ham and Swiss sandwiches

I asked SP to get a loaf of rye bread at the store and it was the perfect bread for these sandwiches. Even though everything is better with bacon, I ended up skipping the bacon on these since they already had ham. The caramelized onions added just the right amount of sweetness to cut through the savory sauce. Delicious.

Grilled Ham and Cheese Sandwiches with Caramelized Onions
Modified from Pinch of Yum

1 yellow onion
1 tablespoon butter
1/4 cup mayo
2 teaspoons Dijon mustard
1 teaspoon Worcestershire sauce
spreadable butter
8 slices of bread (I used rye)
1 pound sliced deli ham
1/2 pound sliced Swiss cheese

Slice the onion into thin strips. Melt 1 tablespoon butter in a small skillet; add onions and cook over very low heat for 30 minutes, stirring occasionally. The onions will turn a deep golden color.

Whisk the mayo, mustard and Worcestershire sauce together.

Spread some of the spreadable butter on each slice of bread. Flip each slice over and spread 1/4 of the sauce on each of four slices, then top those slices with 1/4 of the ham, onions, and cheese. Complete the sandwiches with the other four slices of bread to make four sandwiches, butter side out.

Heat a griddle over medium-low heat. Add the sandwiches and cook until the bread is golden brown on both sides and the cheese melts. You want to go low and slow so the cheese and filling have a chance to warm through before the bread burns.

Cut in half and serve immediately.

Wednesday, September 24, 2014

September 24, 2014

Recipe Remake: Farmstand Corn Fritters

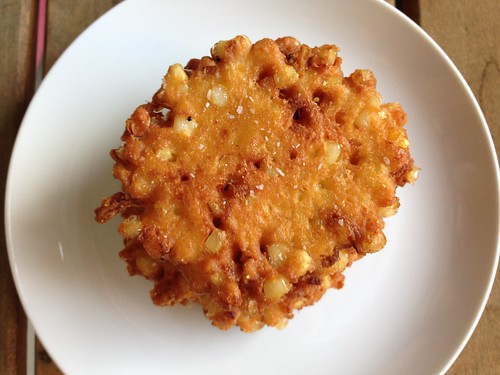
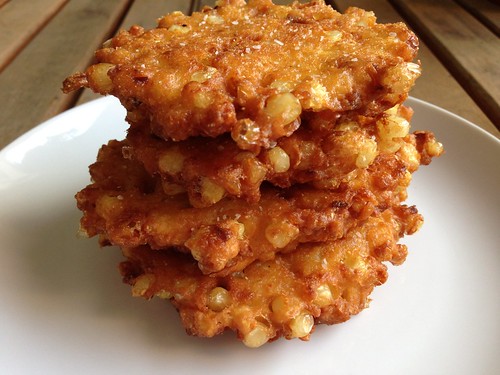
I can't believe I've been making these corn fritters for 7 years already. They're so easy and the flavor is incredible. The last few times I've made them Baby Girl helped by stirring all the ingredients together in the bowl.

Corn fritters

My original post didn't even include a photo (what was I thinking?) and since that post was back in 2007 I figured it was time to bring it back from the archives while corn was still in season (although I'm cutting it a bit close). We usually eat them plain, but you could serve them with a dipping sauce or top them with mozzarella, tomato and basil. We rarely have leftovers but if you did, you could serve them with a fried egg the next morning.

Corn fritters

If you can still get farm-fresh corn you need to make these ASAP. I'm kicking myself for not putting corn on the shopping list this week.

Farmstand Corn Fritters
As seen in Cook's Country magazine Aug/Sept 2005

3-4 ears of corn, husks and silk removed
1 large egg, beaten lightly
3 tablespoons flour
3 tablespoons cornmeal
2 tablespoons half-and-half (can also use heavy cream)
1/2 small shallot, minced
1/2 teaspoon salt
1/2 cup corn or vegetable oil, as needed

Using a chef's knife, cut the kernels from 1 to 2 ears of corn (depending on size) and place in a large bowl. You should have about 1 cup of whole kernels. Grate the kernels from the remaining ears of corn on the large holes of a box grater. You should have a generous 1/2 cup of grated kernels. Add to the bowl with the whole kernels. Using the back of a butter knife, scrape any remaining pulp from all the cobs and put in the bowl. Stir in the egg, flour, cornmeal, cream, shallot, and salt.

Heat oil in a large heavy-bottomed non-stick skillet over medium-high heat until shimmering. Drop 6 heaping tablespoons of batter into the pan. Fry until golden brown, about 5 minutes per side. Leave them alone until you see them starting to brown around the edges, then carefully flip them over to cook on the second side.

Transfer fritters to a plate lined with paper towels. Sprinkle with some salt. Fry the remaining batter. Serve immediately.

Monday, September 22, 2014

September 22, 2014

Grilled Hawaiian Chicken with Coconut Rice

As soon as Ashley posted this recipe for Grilled Hawaiian Chicken with Coconut Rice I knew I had to make it as soon as possible. I could practically taste the coconut rice. The only problem is, Baby Girl is allergic to nuts and that includes coconut. Luckily, she was heading to my parent's house for a sleepover so I put it on the menu for that Saturday night.

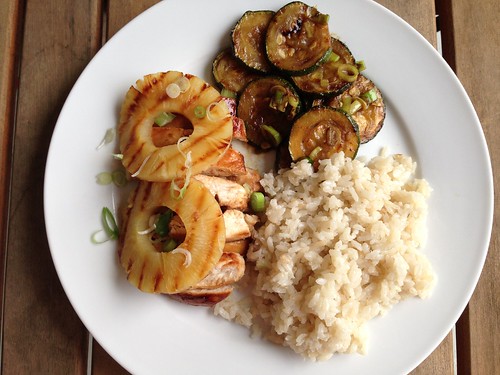
Hawaiian chicken and coconut rice

Do you remember when I mentioned my grill pan suffered a small catastrophe recently? This was the recipe that did it. The brown sugar in the marinade caramelized on the pan and has been next to impossible to remove. Next time we'll be cooking this one on the outdoor grill. And there will definitely be a next time. We couldn't stop oohing and ahhing over this meal. It was absolutely delicious. The rice was our favorite part - the coconut milk adds such a wonderful, rich, creamy, mellow flavor. The rice, combined with the chicken and pineapple, made for a five-star restaurant-quality meal. So, so good. I really wish Baby Girl could join us in eating this one. I know she would love it.

Grilled Hawaiian Chicken with Coconut Rice
As seen on Cheesecurd in Paradise

4 boneless, skinless chicken breasts
1/3 cup soy sauce
1/4 cup pineapple juice (from the pineapple rings)
1/2 cup water
1/2 cup brown sugar
4 scallions, chopped
3 cloves garlic, minced
2 teaspoons fresh ginger, minced
1 teaspoon olive oil
1 can pineapple rings, drained, juice reserved

For the coconut rice:
2 tablespoons butter
1 1/2 cup long grain white rice
1 can coconut milk
water

2 scallions, finely chopped

Place the chicken in a plastic food storage bag. Add the soy sauce, pineapple juice, water, brown sugar, scallions, garlic, and oil, seal the bag and gently toss to coat the chicken in the marinade. Marinate for at least 8 hours, preferably overnight.

Preheat a grill or grill pan over medium heat. Grill the chicken for about 5-6 minutes per side. Remove the chicken from the grill. While it rests, grill the pineapple to give it a slight char. You can serve the chicken whole or slice it into strips before serving.

For the rice: melt the butter in a medium saucepan over medium-high heat. Add the rice, and cook for about 3 minutes stirring occasionally. Pour the can of coconut milk into a measuring cup, then add enough water to equal 3 cups of liquid. Add the coconut milk and water to the rice and stir to combine. Bring to a boil, stir once more and cover the pot. Reduce the heat to low and cook for 20 minutes. Remove the lid and fluff the rice with a fork.

Serve the chicken on a bed of the coconut rice topped with some of the grilled pineapple. Scatter some of the finely chopped scallion over the dish before serving.

Friday, September 19, 2014

September 19, 2014

Fish Tacos with Grilled Pineapple Salsa

While I was making the menu for the week I asked SP if he wanted anything specific for dinner. The first thing he said was "know what we haven't had in awhile, fish tacos." I'll admit, I was a bit surprised. We eat fish regularly but not usually in tacos. I was up for the challenge, especially since Josie had just posted a recipe for Grilled Fish Tacos with Grilled Pineapple Salsa. Those tacos were my inspiration for these beauties.

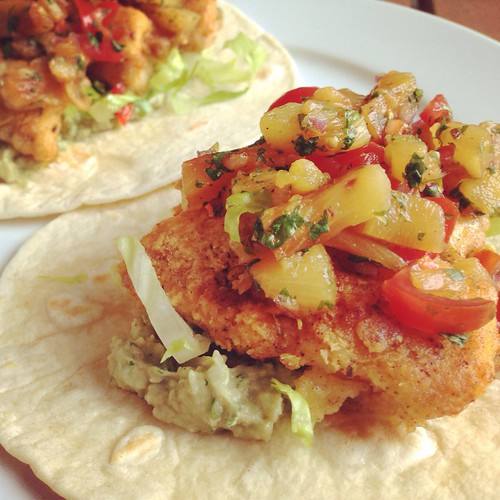
Fish tacos with pineapple salsa

I've mentioned before that we don't own a gas grill, and grilling something as delicate as fish on a charcoal grill would be tricky for a weeknight. My grill pan recently experienced a small catastrophe, so that was out as well. I felt like making a battered fish taco, so I turned to my recipe for tilapia francese. I added a bunch of seasoning to the flour, which resulted in very flavorful fish. When it came to the salsa I knew the peppers had to go since they don't agree with me. I just swapped those out for grape tomatoes. I mashed up some avocado with a little cilantro and lime juice, shredded some lettuce and dinner was served.

We all LOVED these. I had to fight SP for the leftovers. Baby Girl took her taco apart and ate everything separately (such a strange child) but she cleaned her plate. These will definitely be on our permanent rotation. And since I used canned pineapple, we can make these year-round. They'll be such a great burst of summer flavors in the cold depths of winter.

Fish Tacos with Grilled Pineapple Salsa

1 cup flour
1 teaspoon chile powder
1 teaspoon dried oregano
1 teaspoon onion powder
1 teaspoon cumin
1 teaspoon garlic powder
kosher salt and pepper
1 egg
2 tablespoons water
4 pieces tilapia filets, cut into strips
2 tablespoons butter
2 tablespoons extra virgin olive oil

1 can pineapple rings, drained, juice reserved
grape tomatoes, finely diced
3 tablespoons minced fresh cilantro, plus more for serving
1 tablespoon minced red onion

1 avocado, pitted
lime juice, to taste
salt and pepper, to taste

1/2 head romaine lettuce, thinly sliced
Flour tortillas

Place flour in a pie plate and add the chile powder, oregano, onion powder, cumin, garlic powder, salt and pepper. Stir to combine. Beat the egg and water in a second pie plate. Coat each piece of tilapia with flour, then coat with egg, then pit it back in the flour for a second coat.

Heat butter and oil in a large non-stick skillet over medium heat. Place tilapia in pan and cook for about 2-3 minutes on each side until golden brown.

Meanwhile (or you can do this ahead of time), grill the pineapple in a grill pan over medium-high heat until brown on both sides. Transfer the pineapple to a large cutting board and finely chop. In a medium bowl, combine the pineapple, grape tomatoes, cilantro, and red onion. Add a splash of the pineapple juice. Season to taste with salt and pepper.

Grill the tortillas for 30 to 45 seconds per side. Transfer to a plate and cover loosely with a dishtowel or foil.

Mash the avocado in a medium bowl. Add the lime juice, and continue mashing to form a smooth sauce. Season with salt and pepper.

To serve, top tortillas with fish, pineapple salsa, lettuce, avocado, and cilantro.

Wednesday, September 10, 2014

September 10, 2014

Peanut Butter Chocolate Chip Bars

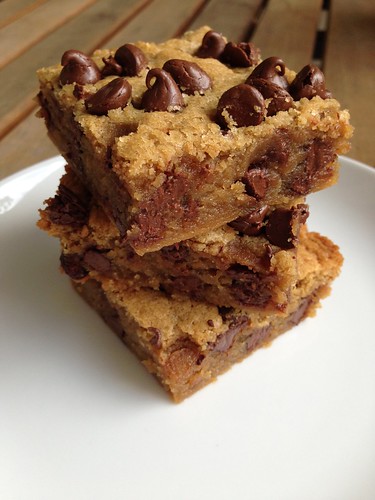
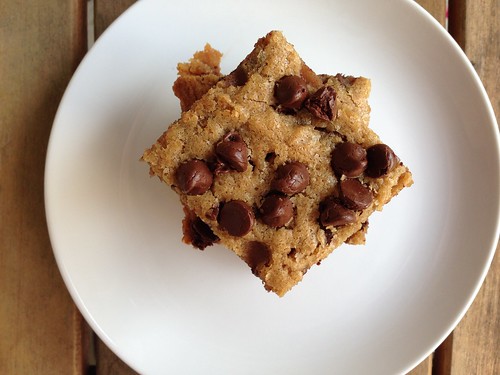
When I posted a picture of these Peanut Butter Chocolate Chip Bars on social media I simply said "I did a bad, bad thing." That pretty much sums up these squares of ridiculousness. Easy to make, sinfully rich, decadent beyond words.

Peanut butter chocolate bars

Now, you all know I rarely bake. So you may be asking yourself why I made these. I made them because I couldn't stop thinking about them. I was innocently scrolling through my Facebook news feed one evening when I came across a photo of these bars. After clicking through to the recipe I couldn't stop thinking about them. I knew I had to make them when Baby Girl wasn't home. My plan was to freeze them and clean the kitchen thoroughly since they contain peanut butter, which she's allergic to.

Peanut butter chocolate bars

You know what's bad about these bars? They're too easy to make. Melt better, mix in the rest of the ingredients, bake, let cool, done. Like I said, too easy.

Just posting a picture of these got two of my friends to make them that same night. I wonder how many more people will try them after seeing this post? Sorry. You're welcome.

Peanut Butter Chocolate Chip Bars
As seen on Averie Cooks
YIELD: one 8x8 pan, cut into 9 or 12 squares

1 stick unsalted butter
1/3 heaping cup peanut butter
1 large egg
1 cup light brown sugar, packed
1 tablespoon vanilla extract
1 cup all-purpose flour
1 cup semi-sweet chocolate chips + 2 tablespoons, for sprinkling

Preheat oven to 350. Line an 8-by-8-inch baking pan with aluminum foil. Spray the foil with cooking spray; set aside.

In a large, microwave-safe bowl, melt the butter. This should take about 1 minute on high power. You may need more or less time depending on your microwave. Let cool for 2 minutes.

Add the peanut butter, egg, brown sugar, vanilla to the butter and whisk until smooth. Add the flour and stir until just combined. Don't over mix. Stir in 1 cup of the chocolate chips.

Spoon the batter into the prepared pan, smoothing the top lightly with a spatula. Sprinkle evenly with the remaining 2 tablespoons of chocolate chips.

Bake for about 25 to 30 minutes, or until done. A toothpick inserted in the center should come out clean, or with a few moist crumbs, but no batter. Mine took 30 minutes.

Allow the bars to cool in the pan for at least 30 minutes before slicing and serving.

Bars will keep airtight at room temperature for up to 1 week, or in the freezer for up to 6 months.